Precious in Purple

Hi, Marilyn here with another attention-grabbing, earth-shaking layout from Alchemist Misty.  I have to say, when I saw this, it reached out, grabbed me, and said “Purple Rules!”.

Purple is truly Misty’s gorgeous niece Mallory’s color and Misty is going to show us how she worked her magic on this eye-grabbing layout.  She can always mix that right amount of grunginess with a touch of sweetness to knock us off our feet (& out of our socks).  So, without further ado or to-do, here’s Misty……………………………………….

Because I am out of white/cream cardstock, and don’t plan to buy anymore, I started this layout on a red piece of cardstock instead and covered it in gesso.  Then, I pressed the rectangle grid punchinella into the wet paint for added texture, added my mists and allowed to dry.  From there I started my layering, first using some music paper from the Acme Kit that I misted and adhered with modpodge.  Then, I continued to layer using some white mesh from the Wedding Night Mixed Media Color Kit, some peacock punchinella, and another piece of the same music paper, tucking in a tag to the left for some journaling. 

Close Up

The sentiment at the top of the page came from cardstock found in the Going Postal Mail Art Kit that I matted with some TH tissue tape.

Filmstrip

I had bigger plans for the film strips but changed my mind in the middle of it all.  Unfortunately, they were already tied down with eyelets so they just became part of the design anyway… 🙂 

Rose Ribbon

I then added the picture and some torquoise rose ribbon as a border.  To add some extra interest, I added pieces of a chicken wire chippy from Scrap FX as well as the “Precious” wordlet.

Mixed Media Layout

Thank you Misty.  Just look at that finished layout!  WOW, doesn’t she make it seem so easy?  A little punchinella here, some layered paper there, give it a good mist, glue on some wording, and KAPOW!, there it is!

Until later………………..
Smiles~
Marilyn

Image Map

Neon Cuteness in a Tutu (or madness and a camera)

Good Morning Everyone!  Marilyn here with a layout from Alchemist Michelle that is stunning in it’s creative cleverness & just so darn cute to boot.  Michelle, show us what you’ve got…………………………………………..

Mutant Robots Kit

My daughter actually napped today!!! For 2 hours!!!  I got to do some work in actual DAYLIGHT!!!  Using the same basic page design I always use, I slapped on some  washi tape, (including some triangles which I am now officially obsessed with) and incorporated the Gauche Alchemy Neon Color Kit and the Mutant Robots Kit (for the Alice In Wonderland quote, rabbit, word bubble and pink frame).  I wanted to include some journaling but I ran out of space, so here’s the story:

I had a very elaborate “Alice In Wonderland” theme birthday party planned for my 1 year old daughter.  That should tell you everything about how it went right there.  Elaborate and 1 year old do NOT mix.  The disaster alarm started ringing from the first step – a photoshoot with a handmade tutu and apron set I thought was “adorable”.  Well first of all, she hated the tutu.  She also hated the insane Carmen Miranda flower tiara I made for her (I was the Red Queen for the party but obviously Mad Hatter was a more appropriate choice).  I took Miss Thang out 7 times over the space of 4 weeks to get 1 cute baby smiling at the camera shot.  I didn’t even manage 1!!!  I was shooting with a brand spanking new point and shoot camera on auto.  Ok – straight talk from the chick who wasted 4 years and 60 thousand dollars on a photo degree.  DO NOT SHOOT TODDLERS IN SCRATCHY TUTUS USING AUTO FOCUS!!!!  Learn to use your new camera on manual setting or pay K-Mart to shoot the darned photo for you.  WHY?  Because your adorable kidlet in a tutu will look at the camera and smile for exactly 3 seconds no matter how long you spend trying to shoot.  The rest of the time the child in question will move around – a camera on auto focus will spend all it’s time refocusing and you will slowly go MAD.  But you knew this, didn’t you?

Closeup Word Elements

Journaling – 173 images.  Yup, you read right, 173 images – well, it’s actually around 300 but 173 is my final edit from all 7 shoots.  I SQUEALED when I saw the page from Alice in Wonderland in my Mutant Robots Kit!  It’s one of my all time favorite books and it fit the theme I had been struggling to capture for a while now.  I altered the grey American Crafts Thickers using some acrylic paint, yellow marker and a fine line pen.  The neon yarn is from the Neon Color Kit.  The background paper is my favorite print from Basic Grey’s AWESOME “Out of Print” collection.

Washi Tape Stripes

TRIANGLES AND STRIPES!!!!  LOOOVE!  Washi tape is so great – cut it up and stick it on – that’s all you need to create all kinds of cool patterns on your paper.  My favorite combos are diagonal stripe, grid and lace scallops.

Washi String Color

I don’t know if anyone else does this but I like adding cream or white mist droplets to my photos for a “Bokeh” effect without all the fancy in-camera technical footwork.  It’s easier than trying to get the right amount of “out of focus” and I really don’t like random messy effects digital “Bokeh” filters add to photos.

Graffitti Inspiration

Let me leave you with this quote:  If you are silent, the walls speak. Please do not forget me they plead.

*********************************************************

Don’t you love it when you can take several different Gauche Alchemy Kits, pull elements out of each, and then watch things “fall” into place (especially when you spot THE piece that you need for your project”?  Even if it does take umpteen shots to get the perfect (or not so perfect) shot?  My eyes are crossing just thinking about looking through a camera that many times!  Michelle, you rock!

Until later……………………..
Smiles~
Marilyn

Image Map

Showstoppers Scrapbook Collage

Hi everyone! Maggi here to share the last project from this month’s guest designer, Lenna Young Andrews. (Actually, we have one more project from Lenna to show you but that’s going in the Gauche Alchemy newsletter so if you don’t already subscribe to our rockin’ newsletter, be sure to sign up today so you don’t miss a thing!)

Today’s project from Lenna is a collage she created with our Showstoppers Kit to go into her new scrapbook…Have at it, Lenna!

*********************************
First, I cut out a nice size piece of the paper to lay my photo on and also cut out a number of the sayings.

Words Cut Out from Scrapbook Paper

I arranged all of the papers and the photo in a pleasing manner.

Scrapbook Collage Arrangement

I edged my cut out words with a 14K Gold marker. Then I cut out 2 hearts and some contrasting strips using the same paper but showing the other side.

Collage Scrapbook Layout

I glued everything down – this photo shows the reverse of both sides of paper.

Scrapbook Collage - Reversed

A close-up of my collage.

Scrapbook Collage Close Up

Lastly, I applied my collage to a full size sheet of cardstock (also from the kit) and slipped the whole thing into a new scrapbook I had recently purchased. I am on my way to filling it!!

Scrapbook Collage Journaling

Fantastic job, Lenna! On behalf of all of us at Gauche Alchemy, we want to thank Lenna for working with our Showstoppers Kit and creating such fabulous projects! Thank you, Lenna!!!

Now go glue something awesome onto some awesome something!

Maggi 😀

Image Map

Neon Diva

Good morning everyone.  Marilyn here with another awesome layout from Alchemist Michelle.  She has worked wonders once again and given us another bright, colorful, happy layout, using our totally cool Neon Color Kit.  Michelle, show us what we can create…………………………………..

Neon Kit Chevron

My daughter astounded me the other day by running up against a corner on the street and posing like a model.  I love how she looked moodily off to the right and stalked off when she saw me press the button on my iPod to take the shot.  This page was a complete fly-by-the-seat-of-my-pants experiment.  I knew I wanted to try out the chevron pattern trend but I don’t have the patience to measure out perfect angles so I did this close up version to simplify the process.  The materials I used were just lying around on my table.  I had to machine stitch everything because the washi tape kept peeling up – word to the wise – use glue or stitch it down if you want permanent adhesion on tapes sold through American manufacturers like American Crafts.  (Oh, hey, did you know we have killer deals on washi tape in our shop now?)

Chevron Stripes Punchinella

The stripes were made using neon pink washi tape, Peacock punchinella, yellow embroidery floss and then machine stitching everything into place.

Neon Layered

So you like the “neon” trend but REALLY don’t want to splurge on new items that cost a fortune only to find out OOOPS you hate the look?  I used older materials for this page that were already in my stash – here the alphas are from Pink Paislee 2011, Crate Paper Paper Hearts, Gauch Alchemy’s AWESOME Neon Color Kit, Hambly, and American Crafts (the tropical inspired Margarita line).  I also bought some cheap neon acrylic paint, price stickers from the dime store, and used gel pens from Sakura which can help you achieve the look for minimal price.

Grafitti Hipstamatic

Just a fun photo you can use to close the page with.  “Neon” photo taken with Hipstamatic’s Ben Watts lens and Big UP film and then altered further using Camera+ app.

Pinwheel Neon Punchinella

Why buy embellishments when you can make your own?  Here I punched out a simple square, cut into each corner, folded in one of the triangles for each corner, and wham – instant pin wheel!  I used a half pearl and a pop dot to secure the middle.  Are there any hand made embellishments you prefer to make?  Leave a comment or a link to your blog and we’ll swing by to check it out!

****************************************
Thanks for sharing this inspiring layout (& your model is totally adoreable) with us.  Just goes to show that you can create great and wonderful things without breaking the ol’ piggy bank.  A little ingenuity and a treasure hunt through you stash is all that’s needed.

Until the next time…………….
Smiles~
Marilyn

Image Map

Behind the Scenes of Misty’s Show Stoppers Mini Album

Hi there! Scraps back with a closer look into some of the details of the mini-album from Alchemist Misty!

Last week we took a page-by-page peek into the mini-album Misty created with the new Show Stoppers Mixed Media Paper Craft Kit. Now we’re going to take a look at 2 of the techniques she used inside the book.

Collaged & Distressed Background Pages

collaged base page
You’ll need:

Show Stoppers Kit
Gesso
Mod Podge
Mists
Sovent ink pad
A straight-edged tool of some sort

Misty: Prepare the backgrounds for all of the inside pages (Sav[ing] the front cover for the last step).

collage

To prepare the pages, cover with Mod Podge, then create a collage by gluing down random sections from the magazine pages.  Then top off with another coat of Mod Podge.

distress gesso

Once the glue has dried, use a straight edge tool like an old room card or credit/gift card and distress the collage by scraping bits of gesso over the top.

distress stamp

After that has dried, ink up your ticket stamp with a solvent ink like Stazon, and then randomly add stamping.  Since we are using this as a distress technique try not to get a perfect stamped image.

close up stamp distress

A close-up of the distressed and stamped background.

Paper and Fabric Flowers

You’ll Need:

Show Stoppers Kit
Scissors
Paint Brush
Glue
Mists
Heat Gun
Fabric
Button

The flower is made out of large heart shapes cut from the pattern paper in the kit.

heart flower supplies

First, I cut out the heart shapes, and then with the end of a small paint brush I curled the edges under.

Scraps: When I first learned to make these sorts of flowers, I had a bobby pin handy and used that on the petal ends, sort of like a quilling tool. It makes awesome, tight curls and then slips right out without having to uncurl the petals!

heart flower petals

Once that was finished I started to assemble the flower by gluing the hearts together at the ends, slightly overlapping each other.

flower assembly

Keep adding layers until your flower looks nice and full.  Then mist in your color choice, scrunching the flowers slightly towards the middle (you may have to curl some of your edges again).  Then use the heat gun to dry…this will urge the “petals” to curl up a little more.

paper ribbon flower

Then add a middle.  Here I used a bloom from a rose ribbon and added an elegant button that came in the kit.

——————————————–

You know, I’ve always started my paper flowers from the center and worked outward. That way does make it easy to stop when you’ve got a full-enough flower, but you end up with the problem of a stem end to deal with if you’re not making a bouquet. I think it’s pretty genius to work from the bottom up if you’re planning to place them on a page, what about you?

~Scraps~

Image Map

Technicolor Life

Good morning, Marilyn here with another terrific layout from Alchemist Michelle.  She’s used bright, happy, neon colors to make her layout really pop.  Here she is to explain how she did it.  Michelle, take it away………..

Neon Color Kit

Two years ago I saw this advert for an Alexander McQueen collection showing a close-up profile of a Mohawked model looking down.  I didn’t realize how deeply ingrained that image was till I shot this photo and realized I’ve been DYING to recreate that photo for 2 years.  The recent advert for the American version of “Girl With A Dragon Tattoo” is a direct “lift” of  that campaign as well.  I’m loving teal stripes, black thread and hexagons right now so they all got incorporated into my final page (the red border is a shellacked table in my apartment).  I used punchinella, die cuts and that AWESOME peacock eraser (which I cut in half to use twice!) from the Neon Color Kit, kraft paper from The Paper Company, Fancy Pants tape, Scrap FX chipboard, and the nail polish is a local store brand.

Nail Polish Neon

Some of the techniques I used on this page prove why joining social networks is essential for artistic development.  I got the nail polish painting technique from JamaicaMakes.com – she posted a photo on Instagram and I knew right away I would be trying this technique out.  Nail polish is GREAT for embellishments like chipboard or alphabets. It has deep color, dimension, and sheen so no extra treatments are necessary.  I added glossy accents to cover up the gel pen “doodling” I did on the heart.  (Doodling in quotes because all I did was outline the shape.)

Polish Paint Chipboard

I have neon purple and pink nail polish I will never use on myself since it chips literally minutes later, but it works beautifully on chipboard! WOOO HOOO!  The Hipstamatic Ben Watts lens adds high contrast to photos so my purple heart went black – there’s poetry there somewhere I’m sure.  I also used the totally AWESOMESAUCE Lablebox app to add writing to my photo.

Scoring Board Kraft Embossing

I’ve had to move all hobby activities to late night since my daughter turned 2 so this is me scoring paper at 2am using a table knife because I couldn’t find my bone folder quietly.  (If you are imagining avalanches of paper, yes, that’s why.)

Scoring Lines

I LOVE this detail shot. I know it’s random but I really like the abstract look of it.  Here you can really see the embossed lines I made using my score board.  Again, this was a technique I found on Twitter from Melissa Mann who designs for Green Frog Studios (amongst other brands).

Chipboard Stitch Hexagon

Lately, I’ve been experimenting with acrylic paint; but when I first started scrapbooking, I used pre-printed paper and embellishments because I felt couldn’t paint or draw, so it’s a little Alanis-type ironic.   Here I watered down some 79 cent acrylic paint in “Citron” and literally spilled it on the kraft paper.  I used a heat gun to dry the paper before it got too warped.

Chipboard Neon

I used neon gel pens to color in the chipboard letters.  I also used neon pastel crayons on the chipboard swirl and scratched a sort of border on them – another technique I found using social media networking.

**************************************
Thanks Michelle.  The layout is totally awesome and the bright, happy colors lift the spirits.  Never would have thought social networking could be another tool for us to use in our art.  Hmmmm, think I’d better get on the ‘net & see what tips I can unearth.  Until next time……………

Smiles~
Marilyn

Image Map

Show Stoppers Mini Album with Major Vintage Appeal

Hi there! Scraps, here, with a fabulous project using the new Showstoppers Kit courtesy of Alchemist Misty!

gauche_alchemy_show_stoppers_mini

That is one stuffed-with-awesome mini-album, right there! Let’s take a closer look, shall we?

Mini_album_cover

Using the included project sheet from the Showstoppers Kit, Misty created a touching testament to her grandparents with the cover inspiration coming from Grandma, herself!

Misty:  the Marquee [comment] totally sparked my interest! So I decided to stick with the “show stoppers” theme and make the cover a marquee introducing my grandma and grandpa and their love story.

I used my Big Bite [to create the holes] and just kept biting away until my holes were big enough to fit the lightbulb. Then I painted it in with glossy black paint ( I cheated and used spray paint) and once the paint was dry, I added my bulbs.  I printed the now showing from my printer and matted it to a rectangular piece of chipboard then I dressed it up a bit by adding rhinestones to the sides.  I also printed out my movie title from my computer and matted it onto a piece of sequined material that was in the kit to add more sparkle.   One of the magazine pages in the kit was an image of a nurse feeding a wounded soldier, so I cut out her arm and hand, scanned it into my computer so that I could flip the image, allowing me to have a right and left hand.  To the left hand I added flowers that came in the kit, and to the right hand I added tickets that also came in the kit.

charms

The first page introduces our “Leading Man.” Now how brilliant is this? Though she covered some of the “bulb butts” with her framed picture, she used the others to anchor the charm garland topping the page. And, oh, I’m a sucker for a man in uniform–especially a vintage uniform!

IMG_6056_edited-1

Sometimes you get an embellishment and you just don’t know what to do with it. Misty ran into this with the Groucho Marx patch from the Showstoppers Kit.

Misty: That smoker had me stumped?!  Then my grandma said “why don’t you make a marquee with him on it?”

I eventually decided to use smokie as a perfect image for a play on words by adding smoke to the cig and stating that my grandpa was “smokin hot”(…ok, its a little creepy when I’m explaining it that way).

A man in uniform is always smokin’ hot. End of story.
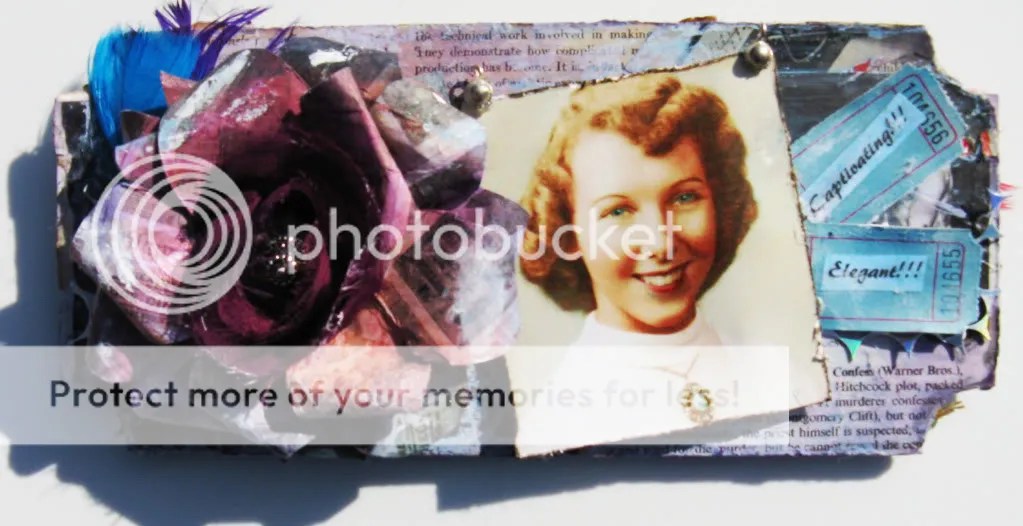
Mini_album_flower

Our leading lady gets her time in the spotlight with a gorgeous patterned paper and fabric rose embellished with a button from the kit–see it sparkle in the very center! This page also used silver punchinella, feathers, ticket stubs and–another genius move–little jewelry bells as picture corners.

mini_album_arrow

Misty: I misted the background in a purple and turquoise then randomly went over it with distress ink.  I cut out an arrow pointing to the previous page, then outlined the arrow with gold beads from the kit.  I also cut out the “nerves of steel” from the g45 paper in the kit, and matted it with some aluminum tape (embossed with my Sizzix). I also cut a star out of the aluminum tape and embossed it.  To the right, lower corner I used the black feather from the kit and placed it under the flower.  The eyelet and gem in the center of the flower were both part of the kit as well.  I added the butterfly from the lady marmalade orange mixed media kit. Then I added a key charm hanging from under the flower.

post_card

Among the pleated filmstrip border, punchinella-overlaid background and gems, there’s a darling story that goes with that charming postcard.

Misty: Shortly after my grandpa passed away my grandma and I were looking through her keepsakes and I stumbled upon the postcard.  I think she probably would have hid it if I hadn’t found it first. lol  The front of the card is a groom in bed waiting for his “busty” bride to come to bed for “snuggle time” and she is sitting at a desk writing out the thank you letters.  It was funny enough to know that my grandpa, who was away in the airforce somewhere, sent this…but the sentiment on the back of the card was even cuter.  He says “Of course, I’m only kidding! I hope its not like that when we get married.  What do you think?”

I thought it was so cute (and a little uncomfortable). Just kidding, I loved seeing this side of him.  After seeing their long relationship where they knew each other so well, I liked being able to see this sort of awkward side to him, when he was still getting to know grandma.

happilyeverafter

Every love story should have a happily ever after. Our couple gets their send-off decorated with a mist-over-modelling paste background (stenciled through heart punchinella), flower-and-fabric flounce and a sweet, to-the-point title whose torched edges give it an instant aging. The dove punctuates the hope of the moment while also balancing an over-torched edge.

Does that just make you want to dig up some old photos?

~Scraps~

Stop the Show! It’s a New Kit!

Hi everyone! Maggi here to show you our newest kit! Presenting: Showstoppers!

Mixed Media Paper Craft Kit

The Showstoppers Mixed Media Paper Crafting Kit is FULL of amazing vintage ephemera, new patterned papers, punchinella and embellishments. Your projects are sure to make the Best Dressed list! Can we say Award for Best Artist? (They give awards for that, right?) You know, I love all of our kits but this one…oh my, Maggi needs it! (Don’t tell the other kits I said that.)

Altered Art Mixed Media Kit

Here’s what you get:

-A random assortment of 11 awesome pages of Gauche Alchemy ephemera (of course)
-An assortment of patterned papers from the likes of Prima, Graphic 45, and others
-A KaiserCraft “Big Ticket” mini album
-A 12×12 piece of our wallpaper paper
-A Tim Holtz “Tickets” stamp
-A Gauche Alchemy “TekniKolor Color Kit” containing various bits and bobs
-A large black sequin fabric swatch
-A small coordinating fabric swatch
-Various lace and trims
-A Groucho Marx patch
-Tickets
-1 Piece of punchinella
-1 Piece of PVC punchinella
-1 12″ strip of film

*Please note the pictures above are merely representations of what you’ll receive; due to the nature of vintage ephemera, each kit is unique!

**This kit is only $39.00 and ships F-R-E-E to the United States and Canada! All other countries pay only $8.00 to ship!**
Scrapbook Paper for Mixed Media

Vintage Ephemera for Mixed Media

Found Objects for Mixed Media

Um, hello! It’s fabulous, right? Strut down the red carpet to the Gauche Alchemy store and get your very own Showstoppers kit today! (Watch out for paparazzi)

Now go glue something awesome onto some awesome something!

Maggi 😀

Image Map

In Bed With Mixed Media Color Kits

Hi everyone! Maggi here to share with you one of, what I like to call my “Night Owl” projects. Ever have one of those? You know, you’re in bed, falling asleep, when all of a sudden you get a creative idea and just have to get started before you forget? Yep, that’s what happened here:
Create Mixed Media Wall Hanging

I was in bed, drifting off to sleep when I got to thinking about the Mixed Media Color Kits. I’ve been wanting to do a project like this for ages, something that incorporated pieces from the color kits and really showed them off. Thinking about it was driving me mad so I jumped out of bed, headed to the glue and was up until 2:00 in the morning putting this bad boy together. 😀

First, I started with a picture I found at the thrift store, then created the background using a technique I found on Julie’s blog, Life With the Tucker and Wolek Clan, I left the pattern paper on (because apparently I can’t follow directions, lol) and also added gel medium and glitter to mine. (P.S.-I am so in love with this technique, I’ve used it multiple times already so I asked Julie if she would guest post this technique here and she said yes! So watch for that coming soon!)

Found Objects Wall Hanging

I then gathered all of my Mixed Media Color Kits and started to lay them out on the background. I was SO happy with my result until I realized I then had to go through and glue everything down. :/ Luckily it went pretty fast and I’m satisfied with my twilight hour project. 😀

Altered Wall Hanging

I’ve always said that our Mixed Media Color Kits are my favorite Gauche Alchemy product. I highly suggest stocking up on them for those late night projects! 😀

Speaking of which, you can stock up on our Mixed Media Color Kits and everything in the Gauche Alchemy store at 10% off through the end of March in honor of National Craft Month!

Now go glue something awesome onto some awesome something!

Maggi 😀

Image Map

Cheryl’s takin’ a walk

Hello there!

Michelle here with a wonderful new step by step process video from Cheryl.

I am currently undergoing the arduous procedure more commonly known as “Project Life” where you shoot and journal every day life. I am already “cheating” by journaling only 2 days a week (if that). What I really love about Project Life or Project 365, a similar 1 photo a day version,  is how it forces me to pay attention to every day details.

Cheryl has taken the much more HUMANE approach by documenting 52 walks she will take this year- one for every week.

Here are a couple of images from week 5 and 6:

Image from week 5. I like the more abstract nature of Cheryl's photos.

This photo is stunning. I. can't. stop. looking! I actually started walking in my neighborhood after I read Cheryl's post about 52 walks on her personal blog.

Now a brief pause while we check in with Cheryl as she makes the binder cover for this project:

And a quickie shot of one of the pages she recently worked on. She used stamps from Sassafras Lass and items from the Blue Streak mixed media color kit.

Please excuse the admittedly imperfect lighting. Cheryl was very gracious to provide this as she was literally on her way out the door for a week long trip to Dublin. But I'm not jealous! (much)

So how are you tackling Project Life or Project 365 or any other year long art project? Let us know by commenting here or linking up your work to the Gauche Alchemy Flickr page!

Check us out on the social networks mi gente!

Image Map