Blended Paper Backgrounds

Greetings and salutations! Scraps, here, with a fantastic technique two-fer from Alchemist Jo!

————————————-

Jo: One of my favorite backgrounds is a blended paper background.  I learned the basic technique from Mary Green when I took her online classes–“Your Vintage Gluebook” and “Collage Coterie”–and have further developed it to suit my style.  I’ve prepared two 4″x6″ postcards to show two variations on the theme.

Firstly, I covered both postcards with pieces of book pages, torn and randomly stuck to the postcards with a gluestick.

blended_paper_collage_background1

Map pages are good, and handwritten letters, receipts, and postage stamps add interest, too. Gauche Alchemy has fab packs of  foreign text paper which would be perfect for a project like this!

For the White Gesso Background

Over the basic blended paper background I added a coating of white gesso.  This can be thinner in some places than others and it’s great to allow some of the background paper to show through.  Remove any excess gesso with a paper towel.  While the gesso is still wet, stick on some pieces of masking tape, making sure it’s well adhered by smoothing down with a bone folder or similar tool.

blended_paper_collage_background_gesso_image_transfer_1

Allow to dry.  No, don’t just count to 30 and then carry on–walk away and go to bed.  It’s best to leave it overnight otherwise when you try and remove the tape it’ll take all the collaged paper with it, which is NOT the effect I think you’ll want!  So, once totally dry, peel off the masking tape which will remove some of the gesso and, hopefully, the top layer of some the paper.  Don’t be too gentle when removing the masking tape, think of it as taking a plaster off a cut knee! [Scraps: That’s a band-aid to those of us in the States 😉 ]

blended_paper_collage_gesso_background_image_transfer_2

Mmmm, this looks so scrummy, I love it!  I then roughly smeared Distress Inks round the edges (Dusty Concord and Peeled Paint).  Where the gesso has been removed by the masking tape, the Distress Ink will be a much stronger colour.

Using your normal everyday inkjet printer print out your chosen image.  I often use The Graphics Fairy, who has a wonderful selection of images which are free to use.  For this postcard I chose a wonderful moth image.  Remember to flip the image because when it is transferred it will be a mirror image.  Especially remember this if there is writing or numbers on the image that you want to be the right way round.  Allow the ink on the copy to totally dry, not overnight this time but I would allow about half an hour.  Cut out the image and, using a paint brush, coat the IMAGE SIDE of the paper with matte Mod Podge (or similar).  Stick this face down onto your background, making sure there are no air bubbles and, if possible, brayer firmly to totally stick it.  Try and avoid getting the Mod Podge on the back of the paper as this will make it harder to remove later (actually, virtually impossible!).

blended_paper_collage_gesso_background_image_transfer_3

IMPORTANT: ALLOW THIS TO DRY OVERNIGHT!

Now comes the magic bit!  Wet the back of the image with clean water (I use a wet paintbrush).  With your finger, gently rub in a circular action.  The image’s paper backing will start to lift in small rolls of paper.  It’s quite messy, but keep with it, adding more water if it starts to feel a bit dry.  Even though you are being careful, some of the image may lift with the backing paper.  That’s OK!  If you wanted a perfect image you’d have simply stuck down the picture, right?  Leave it a few minutes; if there is a white fuzz on your image, then just wet the image again and rub gently, more backing will be removed.

blended_paper_collage_gesso_background_image_transfer_4

As you can see I lost a bit of the moth’s wing, but I’m quite happy about that :o)

blended_paper_collage_gesso_background_image_transfer_postcard_5

I used a quote by Sara Teasdale, rubber stamped onto old book paper and edged with Distress Inks.

For the Clear Gesso Background

Taking the basic blended paper background, I brushed on a coat of clear gesso to seal the background and to provide a decent ‘key’ for the image to adhere to.  The background will, this way, show through clearly.  I dragged Distress Inks round the edges (Dusty Concord and Peeled Paint).  Once dry I cut out my chosen printer copied image (again from The Graphics Fairy), brushed a coat of matte Mod Podge onto the image and put the image face down onto the blended paper background.  Ensure good adhesion by firmly brayering it.

LEAVE IT TO DRY OVERNIGHT.

blended_paper_collage_background_clear_gesso_image_transfer_postcard_1

Wet the image with clean water and gently rub the image backing.

blended_paper_collage_background_clear_gesso_image_transfer_postcard_2

The background is clearly seen through the image, giving rather a dreamy,vintage and/or ghostly effect.

blended_paper_collage_background_clear_gesso_image_transfer_postcard_3

I drew with a charcoal pencil round the image, smudging it with my finger – this adds some depth (another tip learnt from Mary Green‘s classes).  I also used the charcoal pencil around the edge of the postcard and around the title, taken from an old book.  I used rusty wire to attach the old rusty key to the card.

blended_paper_background_clear_gesso_image_transfer_postcard_4

————————————-

I usually go for the instant gratification projects, myself, but this techniques shows that the old saying is true: good things come to those who wait!

~Scraps~

Image Map

Show Stoppers Mini Album with Major Vintage Appeal

Hi there! Scraps, here, with a fabulous project using the new Showstoppers Kit courtesy of Alchemist Misty!

gauche_alchemy_show_stoppers_mini

That is one stuffed-with-awesome mini-album, right there! Let’s take a closer look, shall we?

Mini_album_cover

Using the included project sheet from the Showstoppers Kit, Misty created a touching testament to her grandparents with the cover inspiration coming from Grandma, herself!

Misty:  the Marquee [comment] totally sparked my interest! So I decided to stick with the “show stoppers” theme and make the cover a marquee introducing my grandma and grandpa and their love story.

I used my Big Bite [to create the holes] and just kept biting away until my holes were big enough to fit the lightbulb. Then I painted it in with glossy black paint ( I cheated and used spray paint) and once the paint was dry, I added my bulbs.  I printed the now showing from my printer and matted it to a rectangular piece of chipboard then I dressed it up a bit by adding rhinestones to the sides.  I also printed out my movie title from my computer and matted it onto a piece of sequined material that was in the kit to add more sparkle.   One of the magazine pages in the kit was an image of a nurse feeding a wounded soldier, so I cut out her arm and hand, scanned it into my computer so that I could flip the image, allowing me to have a right and left hand.  To the left hand I added flowers that came in the kit, and to the right hand I added tickets that also came in the kit.

charms

The first page introduces our “Leading Man.” Now how brilliant is this? Though she covered some of the “bulb butts” with her framed picture, she used the others to anchor the charm garland topping the page. And, oh, I’m a sucker for a man in uniform–especially a vintage uniform!

IMG_6056_edited-1

Sometimes you get an embellishment and you just don’t know what to do with it. Misty ran into this with the Groucho Marx patch from the Showstoppers Kit.

Misty: That smoker had me stumped?!  Then my grandma said “why don’t you make a marquee with him on it?”

I eventually decided to use smokie as a perfect image for a play on words by adding smoke to the cig and stating that my grandpa was “smokin hot”(…ok, its a little creepy when I’m explaining it that way).

A man in uniform is always smokin’ hot. End of story.

Mini_album_flower

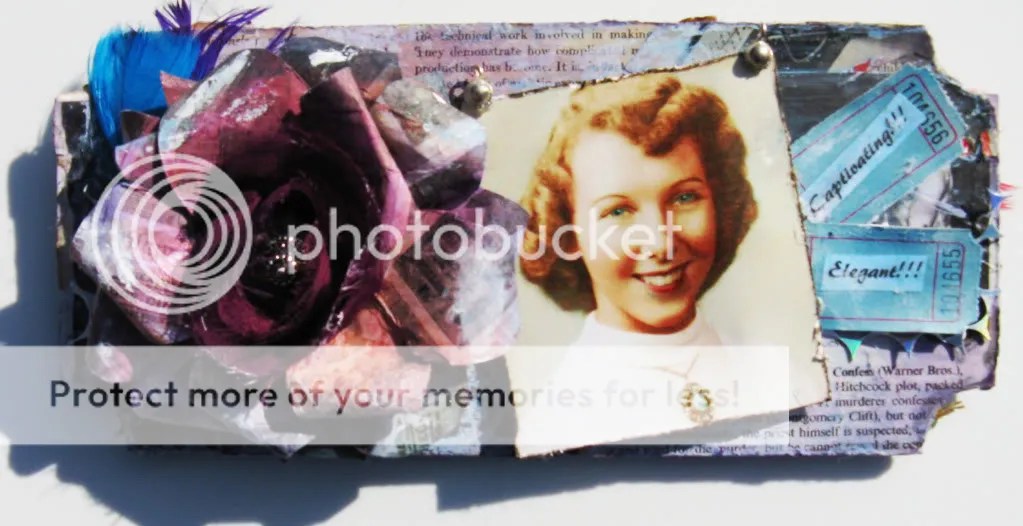
Our leading lady gets her time in the spotlight with a gorgeous patterned paper and fabric rose embellished with a button from the kit–see it sparkle in the very center! This page also used silver punchinella, feathers, ticket stubs and–another genius move–little jewelry bells as picture corners.

mini_album_arrow

Misty: I misted the background in a purple and turquoise then randomly went over it with distress ink.  I cut out an arrow pointing to the previous page, then outlined the arrow with gold beads from the kit.  I also cut out the “nerves of steel” from the g45 paper in the kit, and matted it with some aluminum tape (embossed with my Sizzix). I also cut a star out of the aluminum tape and embossed it.  To the right, lower corner I used the black feather from the kit and placed it under the flower.  The eyelet and gem in the center of the flower were both part of the kit as well.  I added the butterfly from the lady marmalade orange mixed media kit. Then I added a key charm hanging from under the flower.

post_card

Among the pleated filmstrip border, punchinella-overlaid background and gems, there’s a darling story that goes with that charming postcard.

Misty: Shortly after my grandpa passed away my grandma and I were looking through her keepsakes and I stumbled upon the postcard.  I think she probably would have hid it if I hadn’t found it first. lol  The front of the card is a groom in bed waiting for his “busty” bride to come to bed for “snuggle time” and she is sitting at a desk writing out the thank you letters.  It was funny enough to know that my grandpa, who was away in the airforce somewhere, sent this…but the sentiment on the back of the card was even cuter.  He says “Of course, I’m only kidding! I hope its not like that when we get married.  What do you think?”

I thought it was so cute (and a little uncomfortable). Just kidding, I loved seeing this side of him.  After seeing their long relationship where they knew each other so well, I liked being able to see this sort of awkward side to him, when he was still getting to know grandma.

happilyeverafter

Every love story should have a happily ever after. Our couple gets their send-off decorated with a mist-over-modelling paste background (stenciled through heart punchinella), flower-and-fabric flounce and a sweet, to-the-point title whose torched edges give it an instant aging. The dove punctuates the hope of the moment while also balancing an over-torched edge.

Does that just make you want to dig up some old photos?

~Scraps~

It’s a Contest!

Hello everyone!!!  As most of us (at least here in the US) are looking forward to a holiday weekend, I thought it would be the perfect time to share some Gauche goodness with you all.  Amy and I are so thankful for your loyalty, creativity and shared inspiration.

Let’s start off with the eye candy.  Behold, the Exclusive Acme kit!

Each lot of Acme kits we produce is unique, filled with a special array of Gauche goodies that you are not likely to see anywhere else on our site.  At this time, Acme kits are only available through subscription (6 or 12 months),  but THIS WEEKEND ONLY, you have a chance to get your hands on one of these bad boys for yourself!

  Here’s how:

1.  Leave a comment on this blog post telling us your favorite summer activity.

2.  Become a fan on our Facebook page!  If you already are, then tell your friends about us and have them tell us who sent them! 

{just one more look at the goods}

We will choose a random winner from all the participants on Tuesday.

I should also mention that if you are currently a subscriber to the Acme kits, we will substitute with any Gauche products of equal value!

Have a fantastic weekend!!!

PS:  You will definitely want to come back on (or before) Tuesday, because we have some very exciting news you won’t want to miss!

PPS:  Don’t forget your sunscreen this weekend!

Hot Hot Hop!

If you’ve joined us from the Bombshell Stamp/Gauche Alchemy blog hop, welcome!  The theme of this blog hop is HOT HOT HOT!  Perhaps you love (as do I) Marilyn Monroe’s whimsical ways in the movie “Some Like it Hot”…or hot rod cars, or a hot tamale (do they still make that candy?).  For Amy and I who live in the wretched desert of Phoenix, the word hot is something very specific and tangible to us…like the 115 degree day we enjoyed today!

All sweating aside, I’d like to suggest that HOT is more that just a temperature; it’s a state of mind.

Feeling inspired, I decided to create a little card in honor of summer.  I used some of the cardstock and vintage children’s books featured in the premier installment of our Acme kit subscriptions.  I then added some embellishments from the the Blue Streak color kit, and used the Tattoo font stamps from Bombshell to give it a happy title.

Don’t you love the pink tile in our master bathroom– circa 1957, I believe!

Well, you’ve got alot of hopping to do, so you better get on with it! But before you go, please leave a comment here; the Gauche Alchemy prize for this hop will be a random drawing from the commenters on THIS post for a triple color kit with Banana Hammock, Lady Marmalade, and Scarlet Fever.

Here’s the list…make sure to say hi to all the girls and see what hot hot ideas they’ve come up with!
Kas
Gauche Alchemy **you are here**
Kelli
Maggi
Katie
Cheryl
Angela
Erika
Kathi
Pam
Sy
Meredith
Laura
Merdrey Chew
Angie
Yvonne
Steph
Carmen
Terra
Alaine
Alison

Getting Naked with the Kitcsh Delish Kit

Hi! It’s Yvonne with a weekend project for you to do! 🙂

A friend of mine passed me a really beaten up but naked Maya Road lunch tin. The naked part got me excited of course because it means a host of possibilities for decorating…:) The lunch tin got me thinking about food of course (I’m a total foodie!) and so I played with the Kitsch Delish Paper Craft Mixed Media Kit with some bits from the Scarlett Fever Red Mixed Media Color Kit for that punch of color!

Eat only the best

Love this Jenni Bowlin paper which I decoupaged to the front of the lunch tin….I love the faint “Best” so I just added some gold distress stickles (for some glass glitter sparkle!)…and embellished with bits of patterned paper, stickers and rubons.

Eat only the best closeup

I painted these wooden letters (Kaiser Craft) with acrylic paint and inked the edges with distress ink. The brown letter stickers are from Cosmo Cricket.

Eat only the best closeup2

Some bits from the Scarlett Fever Red Mix Media Color Kit

Eat only the best backview

I used the wrapping tissue to fill up the back part of the tin (in place of patterned paper), added the misted doiley, some lovely punchinella (love this stuff!), rubon and sticker!

Eat only the best top view

For the top of the tin, I used patterned paper, a beer label, sticker, doiley, bling, lacey fabric and some charms…
Do you like it?

’tis the other season….

garagle sale booty

lara here …

so, last weekend i stumbled into a neighbor’s garage sale just to see what other’s trash i might find treasure in.
i’m actually not a big garage sale fan, but as i’ve gotten more into mixed media i’ve approached them with a whole different mindset.
…as i have trash piles on the side of the street 🙂

i walked into the house and saw the “normal” stuff – bedding, books, side tables … in the corner was a sewing table. Really gorgeous, but i would have no place in my home for it. Being the nosy, erm curious, soul that i am, i opened one of the drawers and low and behold it was FILLED with all different colors and sizes of lace ribbon. This is when the adrenaline kicked in and I opened another draw – full of sewing accouterments like super old needles in cool packaging, discolored tape measures, BUTTONS … as i wiped the drool from my chin i asked the woman if i could buy this stuff separately or if it came with the table and she was more shocked than i was to see that the drawers were full. She said how about $3 and i said “sold!”

OK … so then my interest was really piqued and i started looking around a little more – a bag of old sewing patterns! Now, i’m not one to sew, the thought of threading a sewing machine sounds like torture, but the artwork on the patterns alone were wonderful! Back in time when they sketched the models… I asked how much for this huge bag and she said “hmmm $10?” i said “ok”. Then in the other corner were a pile of books – i got two super old ones – a dictionary where the pages are already starting to crumble and an old novel from the early 1900’s i’m scared to touch the pages. And she threw them in to my bag – $13 and enough ephemera to last a lifetime!

Tis the season for garage sales – what are some amazing things you’ve found that have quickened your pulse and infused your creativity?

Flying Altered

Greetings, Gauche-kateers!
Angela here!

Have you ever gone into the craft/hobby store for one thing (no seriously, JUST ONE THING!) Two hours later, your husband is calling you in as a missing person, your dinner-less children are in the kitchen eating dry cereal on the floor, and the store’s night manager is following you around looking at his watch as if he’s waiting on it to turn into a magical transporter? It happens to me a lot, actually. But it always pays off (ok, after the silent treatment from the hubby and kids ends).

On my last two hour treasure hunt to the craft store, I picked up the item showcased in this post. When I saw that silly little naked wooden bi-plane, I fell in love with it in that hard-core “five-year-old-girl-loves-a-pink-unicorn” way. I didn’t know exactly what I was going to do with it, but I didn’t care. It moved into my artistic soul and unpacked it’s bags. And there it lived for a couple of months. Until I got my Gauche Alchemy kits, that is. Never has there been a more perfect marriage of object and medium.

I spent my entire National Scrapbooking Day making artistic love to that bi-plane. Five beautiful hours were spent decoupaging, painting, gluing, glittering, stamping and decorating. Never has my muse been so verbal in my ear. Hell, that bitch was practically screaming at me the whole time! And when I was done, it was like giving birth. It was PERFECT. It was exactly what I had envisioned. And I was even more in love than I had been when I first saw it on the craft store shelf.

This precious pocket-sized plane was decorated almost completely with supplies from the Gauche Alchemy Wholey Sheet kit, ACME Mixed Media kit, Geekery kit, Scarlet Fever Mixed Media Color Kit, and Punchinella.

I also used the Cherry Bomb stamp set from Bombshell Stamps to create the pin-up girl perched on the side of the plane (which I think should be a requirement on ALL planes, especially those boring jets they make us fly in these days!) The wings on the top of the plane are Heidi Swapp clear stamps, and the old-fashioned glitter on the propellers is Martha Stewart. The ribbon used around the edges of the wings is Basic Grey. I just love how Gauche Alchemy kits work with anything in my scrap room!

To decoupage and adhere the embellishments, I used Modge Podge, Beacon Adhesives Zip Dry, and Glue Arts Adhesive Squares. I am such a fan girl of all of these adhesives, which save my creative ass on a regular basis!

Now that you’ve seen my high-flying ideas, go grab these fabulous Gauche Alchemy kits and see how they make your creativity soar!

Kas’s Altered Bottles

Altered Project from Kas:

I ran into my inspiration from an altered book group. I saw the blog link and she asked us to take a look at something new she tried……so I did. I love altering bottles but these were really cool:

Altered Expressions Bottle 1

Altered Expressions Bottle 2

I have a few bottles sitting around…lying in wait….and there it was…the bottle of whisky. I thought it would be cool to make a “Manly Man” bottle! So I used vintage pictures, cigar labels and of course LOTS of Gauche goodies. I used items from Wholey Sheets, It’s All Gravy Kit Brown Color Kit, Banana Hammock Yellow color kit, Lady Marmelade Orange Kit and some odds and ends out of other kits, and the beloved Punchinella.

I used hot glue and tried some of Martha Stewart’s decoupage glue and sealer. It was the first time I used it, and I really like it.

Ad Inspiration Redux

Monday we announced a new fun little feature here at Gauche Alchemy – a challenge of sorts – to see how different people creatively interpret this awesome ad:

Monday, we saw what some of the design team did, let’s catch up with the rest of the design team, offer a little more inspiration and remind you you have until Sunday night (Midnight EST) to link up your work to be put in the running for the Wholey Sheets Kit!

Last Friday, Nicole offered a tutorial on creating amazingly gorgeous translucent paper. With that paper she created, and the ad as inspiration she made this:

*********************************************************************************************

Lara made this postcard for a friend:

She says: “The image is from an Adobe Photo Library I found at work. The background is some old Basic Grey papers i cut and put back together. I used that Punchinella which is behind the girl also for the stencil of the dots. The text at the bottom is from some super old old old book i got at an estate sale a couple of weeks ago. The paper lace I misted with my new Coffee Shop Glimmer Mist to match the paper better.

*********************************************************************************************

Kas said of her piece:
“When I saw this ad for inspiration it was the ad I had been waiting for.  Too cool, retro, slick & fashionable.  The perfect ad to inspire this layout of my “gun-slinging” days.  When I was a “tween” my father signed me up for a gun safety class, which led to an invitation to join a Junior NRA rifle team.  You may say….10-13 year old girls (and some guys) what could they do.  Well, I worked my way through the ranks and shot competition beating out many a humbled and embarrassed adult male!!  It was a great confidence booster for a young girl.  Truly something you would never guess about me.

I printed the ad on vellum and colored on the back with Copic markers to give it that Pop Art look.  Punchinella makes a great background for some of my “miniaturized” awards.  The rest of the goodies are from Gauche Alchemy Color Kits: White Wedding Night, Blue Winter SLush, and Blackout.  The stamp around the edge is from Bombshell Stamp’s Cherry Bomb set.

*********************************************************************************************

Andrea’s layout uses Ouchless Cardboard as the canvas and miscellaneous items from the Envy Green Mixed Media Kit.

*********************************************************************************************

Passion re-ignited? Ready to go create?
Remember to link up your lovelies here by Midnight EST on Sunday April 26 and we will choose a winner by random who will win the awesome Wholey Sheets kit!
For bonus chances to win if you post about the challenge somewhere else and let us know, your name will be entered in an additional time!
AND an additional bonus – upload your creation to our Flickr group for yet one more entry!

The Gauche Alchemy Challenge #1

We have SO MANY amazing artists that contribute to the Gauche Alchemy community we would like to issue a challenge to see what you can do! This will be a monthly feature here on the blog and we are so excited to see everyone’s fabulous creations and different takes on the challenges posted!

Challenge #1: Use this brilliantly Gauche ad, courtesy of Vintage Scans to inspire a mixed-media masterpiece!

Link up to here by Midnight EST on Sunday April 26 and we will choose a winner by random who will win the awesome Wholey Sheets kit!
For bonus chances to win if you post about the challenge somewhere else and let us know, your name will be entered in an additional time!
AND an additional bonus – upload your creation to our Flickr group for yet one more entry!

Now, for some inspiration: let’s see what some of your fabulous design team came up with:

Angela used the ad as inspiration to do a layout about her grandmother. Angela says, “Grace Pauline Harris, who we lost in 2007, was a spitfire – never slowed down until the very end. Now that she has passed, I believe that she is my muse, forever looking over my shoulder and inspiring me.

I knew I was going to do this layout the second I saw the Wholey Sheet kit and ACME Mixed Media kit had both a bingo and a Rook card in it – my grandmother’s two favorite games. I created the layout background by gluing wallpaper included in my kit to the corrugated cardboard using Modge Podge. I let it dry overnight, and then sanded it. Man, it created a wicked cool texture!”

**************************************************************************************************************

Maggi decimated her Wedding Night White Color Kit and her Black Out Color Kit to create this standing billboard. She also played with her Bombshell Stamps to give it that extra kick!

**************************************************************************************************************

Yvonne used the Pink Parts Color Kit and a spritz of Red Velvet Glimmer Mist to create this adorable “Pink Pls” layout.

**************************************************************************************************************

Stephanie pulled together bits and pieces from her Pink Parts Color Kit and Winter Slush Blue Kit. That fabulous car (from Bombshell Stamp’s Speed Shop Set) is clear embossed on white cardstock – sprayed with Glimmer Mist – Red Velvet Glimmer Mist and Patina Glimmer Mist finishing it off with acrylic paint smudged around edges….

**************************************************************************************************************

Erika made this piece using just about the whole Gauche Alchemy Artfire store!
All of the texture is done with Delta Gesso. Then sprayed with an assortment of Glimmer Mist. Inked up with Fired Brick Red Distress Ink and StazOn Jet Black, highlighted stamped image with her Inkssentials White Opaque Pen and then finished off with pieces from her Scarlet Fever Red Color kit and Wedding Night White Color Kit.

**************************************************************************************************************

Remember – you have until Sunday night to create something all your own and link us up!
We’re so excited to see what y’all come up with!!!!!!!